Artwork Guide
Folders
When supplying your artwork to us there are just a few steps that need to be taken in order for you to supply us with the correct files. Please view the below information and if you require any further information or assistance then please get in touch by email or phone.
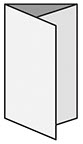
2 Versions.
File Format:
Version 1
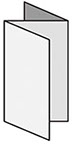
Version 2
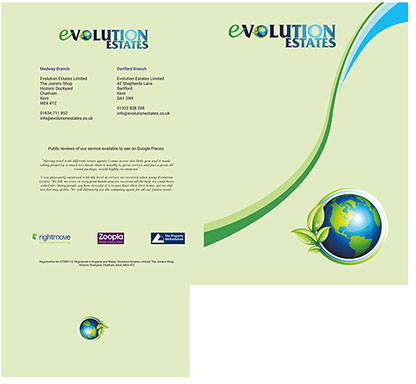
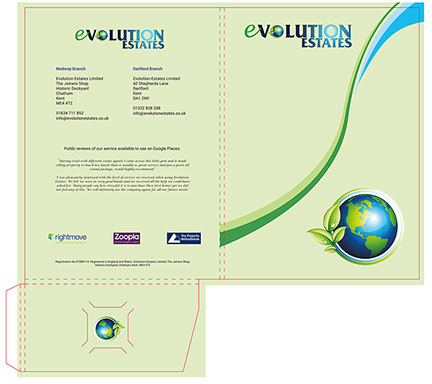
Templates can be downloaded from our website here. We suggest setting these up in their own layer in the software that you are using to create your artwork, such as Adobe Indesign, Illustrator, Photoshop, Quark etc. A minimum bleed of 3mm should be incorporated into the artwork extending outside of the folder template, we then require the artwork in 2 versions, one with folder template imposed as per V1 above for die cutting positioning and one exactly the same only without the template shown which will be used for printing as V2 above. For double sided designs please use the template on the second page of the downloadable files or flip the first side of the template through a horizontal axis making sure that it centralised to the centre of design page.
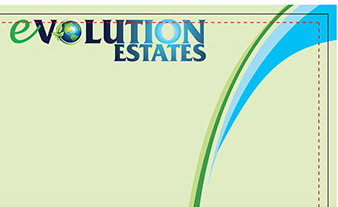
Bleed
Bleed is a printing term that is used to describe a document which has images or elements that touch the edge of the page, extending beyond the trim edge and leaving no white margin. When a document has bleed, it must be printed on a larger sheet and then trimmed down to fully ensure the print on the final product fully extends to all edges.
The example below shows how a document should be set up with bleed. This is the way you must set up your document if you intend to have a design which has images or background colours which extend all the way to the edges.


Quiet Zone
As we’re diecutting your folders to size and don’t want your text or logos to look as though they are falling off the page, or worse, be cut into we recommend a ‘quiet zone’ of 5mm
Leaving a margin of 5mm inside the folder template guide from the edge of the artwork allows text and logos to sit on the page comfortably without any risk of looking like an afterthought. Any photographs, patterns or background colours can go to the edge of the print, we’d recommend making them go to the edge of the bleed.

Flyers
A3 = 420x297mm
A4 = 297x210mm
A5 = 210x148mm
A6 = 148x105mm
DL = 210x99mm
Bleed = 3mm
Quiet Zone
File Format:
Bleed = 3mm
Bleed is a printing term that is used to describe a document which has images or elements that touch the edge of the page, extending beyond the trim edge and leaving no white margin. When a document has bleed, it must be printed on a larger sheet and then trimmed down to fully ensure the print on the final product fully extends to all edges.
The example opposite shows how a document should be set up with bleed. This is the way you must set up your document if you intend to have a design which has images or background colours which extend all the way to the edges.
Quiet Zone
As your document will be trimmed to size once printed you don’t want your text or logos to look as though they are falling off the page, or worse, be cut into, as such we recommend a ‘quiet zone’ of 5mm
Leaving a margin of 5mm inside the edges of the finished document size allows text and logos to sit on the page comfortably without any risk of looking like an afterthought. Any photographs, patterns or background colours can go fully to the bleed edge of the artwork.
Letterheads
A5 = 210x148mm
File Format:
Bleed = 3mm
Quiet Zone
Bleed = 3mm
Bleed is a printing term that is used to describe a document which has images or elements that touch the edge of the page, extending beyond the trim edge and leaving no white margin. When a document has bleed, it must be printed on a larger sheet and then trimmed down to fully ensure the print on the final product fully extends to all edges.
The example opposite shows how a document should be set up with bleed. This is the way you must set up your document if you intend to have a design which has images or background colours which extend all the way to the edges.
Quiet Zone
As your document will be trimmed to size once printed you don’t want your text or logos to look as though they are falling off the page, or worse, be cut into, as such we recommend a ‘quiet zone’ of 5mm
Leaving a margin of 5mm inside the edges of the finished document size allows text and logos to sit on the page comfortably without any risk of looking like an afterthought. Any photographs, patterns or background colours can go fully to the bleed edge of the artwork.
File Format:
Folded Leaflets
Half Fold
4 Sides
Roll Fold
6 Sides
Z Fold
6 Sides
Cross Fold
8 Sides
Bleed = 3mm
A4 = 297x210mm
A5 = 210x148mm
DL = 210x99mm
Bleed is a printing term that is used to describe a document which has images or elements that touch the edge of the page, extending beyond the trim edge and leaving no white margin. When a document has bleed, it must be printed on a larger sheet and then trimmed down to fully ensure the print on the final product fully extends to all edges.
The example opposite shows how a document should be set up with bleed. This is the way you must set up your document if you intend to have a design which has images or background colours which extend all the way to the edges.
Bleed = 3mm
Quiet Zone
Quiet Zone
Bleed = 3mm
Quiet Zone
As your document will be trimmed to size once printed you don’t want your text or logos to look as though they are falling off the page, or worse, be cut into, as such we recommend a ‘quiet zone’ of 5mm
Leaving a margin of 5mm inside the edges of the finished document size allows text and logos to sit on the page comfortably without any risk of looking like an afterthought. Any photographs, patterns or background colours can go fully to the bleed edge of the artwork.
File Format:
Business Cards
Bleed = 3mm
Quiet Zone
Quiet Zone
As your document will be trimmed to size once printed you don’t want your text or logos to look as though they are falling off the page, or worse, be cut into, as such we recommend a ‘quiet zone’ of 5mm
Leaving a margin of 5mm inside the edges of the finished document size allows text and logos to sit on the page comfortably without any risk of looking like an afterthought. Any photographs, patterns or background colours can go fully to the bleed edge of the artwork.
Bleed = 3mm
Bleed is a printing term that is used to describe a document which has images or elements that touch the edge of the page, extending beyond the trim edge and leaving no white margin. When a document has bleed, it must be printed on a larger sheet and then trimmed down to fully ensure the print on the final product fully extends to all edges.
The example opposite shows how a document should be set up with bleed. This is the way you must set up your document if you intend to have a design which has images or background colours which extend all the way to the edges.
File Format:
Compliment Slips
Bleed = 3mm
Quiet Zone
Quiet Zone
As your document will be trimmed to size once printed you don’t want your text or logos to look as though they are falling off the page, or worse, be cut into, as such we recommend a ‘quiet zone’ of 5mm
Leaving a margin of 5mm inside the edges of the finished document size allows text and logos to sit on the page comfortably without any risk of looking like an afterthought. Any photographs, patterns or background colours can go fully to the bleed edge of the artwork.
Bleed = 3mm
Bleed is a printing term that is used to describe a document which has images or elements that touch the edge of the page, extending beyond the trim edge and leaving no white margin. When a document has bleed, it must be printed on a larger sheet and then trimmed down to fully ensure the print on the final product fully extends to all edges.
The example opposite shows how a document should be set up with bleed. This is the way you must set up your document if you intend to have a design which has images or background colours which extend all the way to the edges.
File Format:
Brochures
A5 - 148x210mm (portrait)
Bleed = 3mm
Quiet Zone
Quiet Zone
As your document will be trimmed to size once printed you don’t want your text or logos to look as though they are falling off the page, or worse, be cut into, as such we recommend a ‘quiet zone’ of 5mm
Leaving a margin of 5mm inside the edges of the finished document size allows text and logos to sit on the page comfortably without any risk of looking like an afterthought. Any photographs, patterns or background colours can go fully to the bleed edge of the artwork.
Please transfer these individual pages to us in a multi-page PDF document.
Please do not forget to delete empty or superfluous pages from the file before your final save. Desired blank pages have to stay in the file.
When transmitting individual sides, please include the side number in the file name. A sorting based on the side numbers in the file will not be done.
Bleed = 3mm
Bleed is a printing term that is used to describe a document which has images or elements that touch the edge of the page, extending beyond the trim edge and leaving no white margin. When a document has bleed, it must be printed on a larger sheet and then trimmed down to fully ensure the print on the final product fully extends to all edges.
The example opposite shows how a document should be set up with bleed. This is the way you must set up your document if you intend to have a design which has images or background colours which extend all the way to the edges.
File Format:
RGB vs CMYK
Computer monitors emit color as RGB (red, green, blue) light. Although all colors of the visible spectrum can be produced by merging red, green and blue light, monitors are capable of displaying only a limited gamut (i.e., range) of the visible spectrum. Whereas monitors emit light, inked paper absorbs or reflects specific wavelengths. Cyan, magenta and yellow pigments serve as filters, subtracting varying degrees of red, green and blue from white light to produce a selective gamut of spectral colors. Like monitors, printing inks also produce a color gamut that is only a subset of the visible spectrum, although the range is not the same for both. Consequently, the same art displayed on a computer monitor may not match to that printed in a publication. Therefore for printed documents you must convert all RGB files to CMYK
At certain points during your work you will have to convert images from RGB to the CMYK color space. Any respectable image editor or file layout program has a option for it. Sometimes it can be tricky to fine the specific option to convert to CMYK.
Here is a list of several common programs with instructions on how to convert the color space to CMYK.
If the file already exists select the following menu options: Image > Mode > CMYK When starting a new file select CMYK for the mode before clicking OK.
Use the following menu options: Window > Swatches and Window > Color. Double click color in Swatches Change color mode to CMYK and color type to Process. Any colors created in the document that are not in the Swatches palette, need to be changed to the CMYK color space. Select each object you want to convert and make sure the Color palette reflects the CMYK percentages. Click top right arrow in the palette to change to CMYK if necessary.
Select each object you want to convert. Select the Fill tool and click Fill Color Dialog. Make sure the Color model is CMYK. For each object with an outline: Select the Outline tool and click the Outline Color Dialog. Make sure the Color model is CMYK.
Use the following menu options. For an existing file select Edit > Select All and then Filter > Colors > Convert to CMYK. For a new file, select File > New and select CMYK color for the Color Mode.
Use the following menu options: Edit > Edit Colors > Show Colors in Use > Highlight Color and click Edit. Change model to CMYK and deselect Spot color.
Use the following menu options: Window > Show Colors. Double click "colors" in palette and select Model to be CMYK and Type to be Process. Please be advised that Pagemaker does not successfully represent CMYK color on the monitor.
Yes! It's very important if you are working on a print document. Commercial printers mostly accept RGB images wihout question but using images with a RBG color space can seriously mess up your image. Printers who accept RBG images auto-convert images to CMYK without checking the outcome.
Make sure you convert images to CMYK yourself, so you can do adjustments on the CMYK outcome if needed and keep 100% control over image quality.


